Search This Blog

Tuesday, August 31, 2010

The rest of the living room...


This is the South wall in the living room...it was my first and only attempt at putty...I thought, in all my infinite wisdom...that I would just putty those holes from the tacks and nails...this is two hours worth of filling...NOT HAPPENING...if I would have continued? I would still be standing at this wall filling holes....


There were too many...so in my newly acquired attitude of  "this is for the birds"...I primered over those holes...hmmm...paint fills them better than putty and I don't have to sand...don't know if anyone has ever used Kilz paint? Well, it is some thick stuff! Not my first choice in paint but where I live? It is the only choice...I did end up using caulk for the knot holes  and some of the big cracks...no sanding, just wipe off what you don't want with a damp rag...oh...and my wonderous ability with a caulking gun? I had more on my head than the wall...took awhile to figure out how to stop that endless stream of caulk coming out of the gun...sometimes? I am waaay short of brilliant!

This room took forever...I was really very tired of this room...I didn't have as much loathing of the basement as I did for that BLUE PAPER!

The floor in this room had some real damage...it was mildewed and buckled...instead of ripping it out we thought we would try heat first and see if it would "relax" to normal...a testament to how durable these floors are? An 8 inch tall bubble 6ft long did relax and went back to normal! And of course, the "Super Clean" treatment got rid of the motor oil and mildew...then 3 scrubbings with Ammonia....


took the rest of the finish and the hundreds of coats of paste wax out of the cracks and off the wood....


You can see the long line of mildew to the left...
I don't know if anyone has priced wood floor refinishing? Wow...$5800.00 big ones to have these professionally refinished...hmmmm...not happening for this chickee! So I got on the net and asked around...they didn't always have Varathane...what did Granny use?  No one seemed to know...there was information about using lye to scrub and paste wax to make it shiny but nothing about old floor finishes...I believe Shellac was used at one time and that is probably what was on these floors along with a few coats of wax for protection...but it had long since warn off...well the wax was still there in the cracks but the only finish I had was good old fashioned dirt! Your feet would literally turn black if you walked on this floor...

I lucked out one day and found an ingenuous woman who was in the same dilemma as I was...she had experimented with several things and found one that suited her and worked well...she had put a coat of plain mineral oil all over her floor, let it soak in and then did it again...following that with 4 coats of paste wax...WOW...her pictures? Made it good enough for me! Couldn't hurt...my floors were bare wood with nothing to lose...the floor "finish" costs me a total of 14 bucks...one bottle of 1.49 mineral oil and a tub of past wax did the entire floor. As it took place...the difference amazed me..they looked like brand new!


the floors testing the mineral oil...

Where the bubble was had deep black spots in it that no amount of scrubbing was going to get out, I tried bleach...lightened the a small amount...but nothing like I hoped...so I went and bought a small can of stain and mixed it with the mineral oil...it covered it all!..When the last coat of paste wax was on? I buffed the heck out of it all...and spent the next day and a half skidding across it in my stocking feet...no dirt...no black socks! Just shiny pretty floor...
I will get pictures of the finished floor soon...I don't have any as yet and have not ventured to the store to buy batteries for my camera!
My neighbor knocked on the door at this point...he walked into my living room and said "WOW" you put new windows in, it's so bright in here!"  "uh...no...I just fixed the ones that were here"..."I didn't even know that big window was in here! I have never seen it before and I have lived next door for six years!"
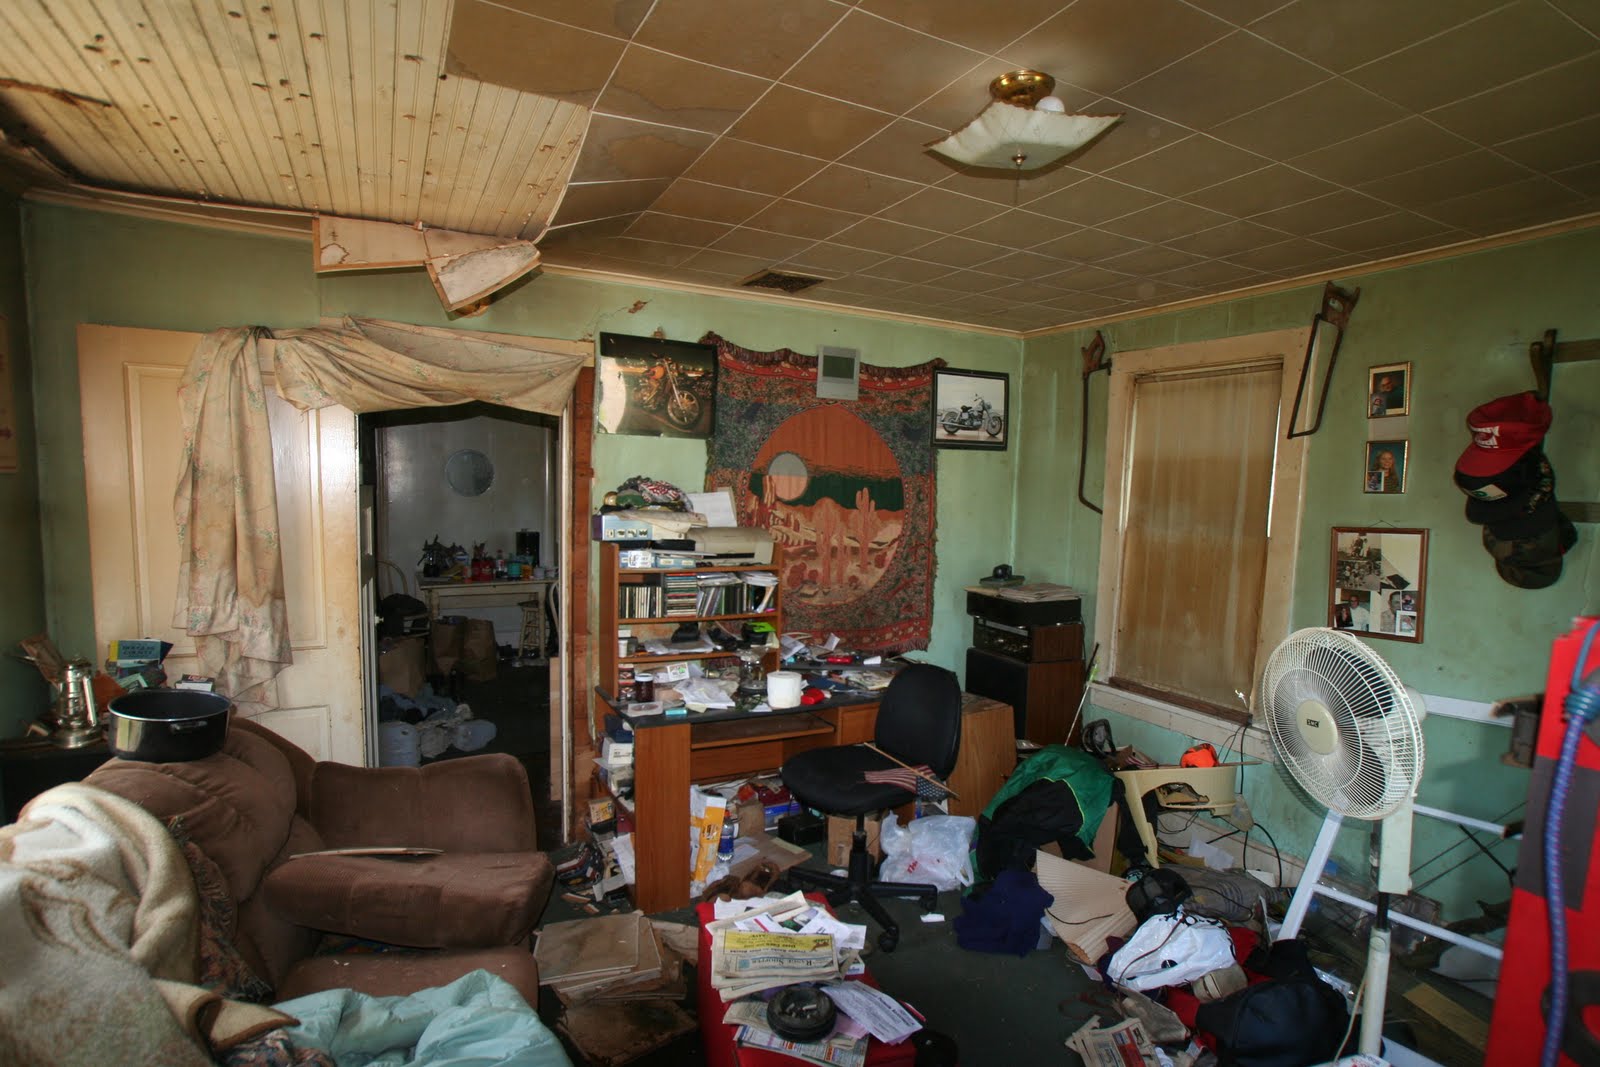

Before...

During...

After Day LIGHT!
After...Night time with only one lamp...
Sure made me feel better about the room! This is what it looks like to date but all the corners are stuffed with odds and ends...it is still very much a storage room as all my coming winter projects are in here...


This winter my future plans are to cover the furniture with white slip covers...build book shelves( I have the most beautiful window to use as a door!) and paint the china cabinet...I have found dishes that were made right here...someone's kids were cleaning out Mom's house and were taking them to the dump...in addition, I have been collecting pictures, making art and planning a rug...I also have a brand new set of french doors to put in the South wall and a full glass door to replace that horrible front door that is there. It is not original and the "window" is plexiglas!

I was in a quandary about the door in this room leading to the kitchen...it was so beautiful...and charming but it really served no purpose and took up space...I took the paint off of it and the original finish is in beautiful shape...so, I will let you all decide...keep it? or OUT?


This winter, as I finish things for this room, I will post new pic's...I picked up an Ethan Allen sofa for $20.00. It is fantastic shape and is super comfortable...I think white slipcovers will complete the cottage look? What do you think?


Friday, August 27, 2010

The living room...

I have had a busy day! I am going out of town tomorrow to deliver Tristan to his new home! I am so excited for him as he will have 3 acres of fenced yard to roam around on instead of being confined in the tiny space he has at my house!  I will be back late tomorrow night and try to get the rest of it on here on Sunday...Thank you for being so patient with me!

Thursday, August 26, 2010

The "weed" free living room...


Where the couch sits is the South window...
After throwing, cleaning and sorting...I took stock of the living room itself...because of the water damage, the floor by the South window was buckled and mildewed, there were NINE layers of wall paper on the walls...with some of it peeling off in patches...especially under those windows...the South window was rotted and it was barely hanging in there....sooo...I started with measuring the room itself...I don't know why I did that...maybe to return to some semblance of normalcy...don't ladies usually measure for rugs and such? or maybe I was just stalling...it was 14x15...and then I went and got a scraper, my ammonia water bottle, a bottle of scrub free mildew remover...I had not graduated to Super Clean yet...a scrub brush and a pail of water...and I peeled off wall paper...I removed all of the molding from the windows and the floor...I was in love...the original 8 inch mop boards were still in tact...and all of the 1x4 molding around the windows was in fantastic shape... I piled it outside to scrape the paint off...well...it didn't turn out like that...It took me so long to prep the walls that by the time I got back to the molding it was one GIANT molding ice cube...it took me an entire afternoon with a shovel to dig it out of the snow and drag it inside to thaw out...
You would think that the snow would have some affect on the dirt...nope..just froze the filth to the boards...

The difference...first one was how it was when I got it...second one is washed and third one is with the paint scraped off...just a little contrast to show you how dirty it was...


7 layers of the wall paper were just normal paper ranging from 1930 maybe...to the pink and grey 1980's...the first layer was a layer of that cover paper that someone had just thought painting an erroneous shade of blue would cut it....but the bottom layer of paper...blue cardboard type paper...stuck on with something akin to hide glue...hide glue...anyone experience it? well it is like a combination of super glue and rubber cement...It was horrible..and hard to get off...I ended up soaking huge pieces 2 and 3 times and scraping with the paint scraper...not only did it stick to the wall? but as soon as it hit the floor, it stuck to the floor...after a couple of hours of scraping I would have to move on to something else...so I picked staples out of the ceiling for awhile and would then go back to scraping...it took two weeks of daily scraping to get that stuff off...I ended up with an entire 50 gallon garbage sack of  BLUE PAPER!  Blue paper has become the anti christ to me...NO MORE BLUE PAPER! EVER!  Not even to write on...I will take yellow or white thank you very much!


I saw what was under that paper...because the patches under the windows had come off...it was old fashioned ship lap...big 10 inch solid hardwood boards..


.I fell in love with them...scouting the net? People are paying big bucks to have walls like mine installed for that cottage charm that is so popular now a days...and charming they are...this is a small cottage after all and the rustic, vintage look appealed to me right away...


My thoughts were an English cottage style....the quiet, calming, cozy, comfort of a sun filled room brimming with overstuffed furniture and books...as my home is so small...I took the advice of the HGTV design crews and decided to paint all the rooms on the main floor one color...so that was a relief! I wouldn't have to go thru the nightmare of selecting paint color again! I was so excited to paint it...what I didn't bargain for was the many days I spent pulling tacks and small nails out of those boards...I don't know what they were thinking when they put that cardboardy paper on there...they not only glued it to the wall... they tacked it up there too...like it was going to sprout legs and take off...I pulled an entire 5lb coffee can of tacks out of the walls...if I ever get to finish the furniture for this room, I will NEVER have to buy furniture tacks..

.

I also scrubbed and scrubbed until every miniscule particle of mildew was gone...
Next came primer...I didn't bargain for that either...I bought rollers...and ended up going right back for an itty bitty paint brush to slosh primer in all those cracks between the boards...


 3 gallons of primer later...


The amount of light that came out of painting the walls and ceiling white was incredible...it was like being outside on a sunny day in the snow! There used to be an old kerosene stove in this room...it was in the cabin when I got the house...the chimney hole is still there, haven't figured out quite how to cover it yet...I also took the windows out...it was 9 degrees outside, LOL! but the storm windows held it at bay somewhat...there was an inch of ice on them inside and out which really prompted me to stop painting the walls and work on the windows!  I have never tried to get panes out of old windows before...the glazing was rock hard and was terrible to chip off...Super Clean...that is all I have to say...amazing stuff...
I was terribly relieved when I got the North one done...it came out beautifully...I drilled a new window catch in it as I had taken the bottom of the South window(it was in better shape) and replaced the North with the South...does that even make sense? it did to me when I first thought it...hee hee...Maybe the paint fumes have gotten to me a little too, Sandi!


I replaced the molding before I painted the walls...why? impatience probably...and what little room I had to work with was being eaten up by storage items piled in the middle of the room...add really long lengths of molding and it was getting ridiculous!


I did think about not painting that beautiful fir molding...but the process of getting all the shellac off, sanding and then refinishing was a little more than I could take...plus the cottage look I was after demanded white molding! I don't regret painting them...

Tuesday, August 24, 2010

Additions to the living room...

After reading the comments, I have to tell you a story about the biggest dilemma of all...
I beat the tar outta that soggy, nasty couch and threw it out the door...underneath it were these boxes...5 in total...I put them in the save pile because they were really ornate and pretty...some were wood...one glass one and the two tupperware one's I just tossed in the trailer...
I went about my business...carting things out to the trailer and tossing stuff in my burn barrell...the process went on and on...til I had that trailer almost full...

I was so tired...so..I decide to take a break and peruse thru the treasures I saved...the saved, forgotten boxes were set out and I opened them...

Guess what was in them?  SEEDS! Hmmmm...I couldn't wait to show my Honey! Garden seeds...maybe this guys wasn't so bad after all! And some plumbing parts...and various things...some dried leaves..potpourri maybe?

When my Honey came to pick me up...I proudly showed him my seeds...Uh..Lisa...those are not flower seeds...those...Um...are Marijuana seeds...and the rest? Not plumbing parts...they are pipes and screens to smoke it with...and the potpourri?  Marijuana, Honey...
OH MY GOD!...I can't take these to the transfer station...I will get arrested...they will confiscate my house...I will be homeless...or in jail...I will throw them in the burn barrell...HOLY! I can't throw it in there...what if the neighbors smell it?  WHAT AM I GOING TO DO?

I dunked all the seeds in weed killer and buried them...I smashed all the "plumbing parts" with the hammer til they were unrecognizable and threw them in the van that the salvage yard was coming to take away...and then...I went thru every single inch of that trailer to retrieve the tupperware boxes... and I proceeded to give them  the same treatment...

Looking back on that?  That is some paranoia...and I never smoke Marijuana...


The Living Room...


This was my first impression of my living room when I opened the door...The county had taken the sheets off of the one window to let light in so they could take pictures...The Mister who had it before, covered every opening...windows, doors...with sheets and blankets...it was like a tomb...
You can see in this picture, my concern for natural light in the kitchen...
I think the pan was for the drips...
It was also raining that day...and it was raining...pouring actually...right into the living room...

It was stuffed full of furniture, garbage, mail...old clothes and computer accessories...pornography...it was hideous...and filthy...the window casings were rotted so it must have been going on for a very long time..
Scene from creepy movie...
sorting out the treasure...
LIGHT! after removing the curtains and blankets!

To imagine how dirty the room was, you can see the semi "clean" spots where he had hung stuff up...Everything that was on the walls had an outline...I stood there for a minute....took a couple pictures...the smell was awful...the couch was sopping wet as were the clothes and curtains...there was spilled motor oil all over the floor, it had seeped into the wood and the rug...mildew had taken over parts of the wall and the wood floor..


.the ceiling tiles were sagging with the weight of the water...and the floor had warped up about 8 inches 6ft long under the couch and running into the kitchen...

I took a tour of the house...walked thru the kitchen, looked at the pantry..opened the little closet door...where I found a broom...hmmmm...I went back to the living room...and poked those ceiling tiles...several came down...BEADBOARD!....
 If you look close you can see where these tiles originally were snowy white...


went up the stairs...where water was also pouring down the stairs...looked at the bedrooms and their contents...went back downstairs...into the back porch and thought..."nope"...not even going down into the basement...that is my Honey's domain...for now....

I was a little intimidated...no running water, except for the rain running down the wall onto the floor...no electricity...no bathroom...hmmmm....HOLY CRAP!

I went outside for a breather...toured the yard...that is when I took the picture that now graces The Dilletante Proprietor...the dilapidation...dirt...garbage...turned into charm right then...looking at that picture? turned my growing trepidation into want...it was sunk into the dirt, you couldn't even get the door open, bags of garbage were piled in front of it...someone had dug a two foot deep hole to get it open...it was crammed to the rafters with beer bottles, garbage AND old garden tools, doors, enamel ware and miscellaneous other treasure...
 
 that little building stole my heart..


I walked back to the front door...told my Honey to back up the trailer, please...and he did...right over the stairs TO the door...I went to the car, grabbed the tools I had brought, climbed over the trailer, stepped into the living room...and started BEATING the crap outta that couch...

I don't know how they got it into the living room...maybe it was so water logged that it swelled up but it would not fit thru the door so it came out in large chunks...after the first piece came sailing thru the door and into the trailer...narrowly missing my Honey's leg and maiming him severely...he suggested that he go see what he could do about the roof...when I clean? it is a frenzy...and NO man is safe if he dares to cross the path...


I did not think to take pictures before I threw some of the stuff into the trailer...there were over 300 playboy magazines stacked in this living room...when I put the living room on HGTV...several people had a good laugh about the ones left over! It is so funny what people notice....

I spent all day sorting and throwing...our trailer is 8ft wide by 16ft long with 7ft sides....I filled it to overflowing...looking at all the paper and wood the next day? I went Montana on that trailer...why pay to have this trailer emptied at the transfer station?  I sent my Honey for a Sawz All...ripped the old oil tank off the garage, had him cut a door in it....instant burn barrell! 


 I ended up going back thru that trailer and taking out all the paper and wood and burning it...that barrell burned for days on end....
It is a true money saver...I still use it all of the time for brush and garden waste...the stuff I do not put in the compost pile...
After three days? You could finally walk thru the living room...


Sunday, August 22, 2010

Busy Weekend...

Hi all! My Honey went to work at 7:00a.m on Friday and didn't get home til Saturday at 4p.m...the neighbor had an emergency with his vehicle and my Honey stayed all day and night and into the next day to get it finished for him...I have been on my own this weekend and have had to get some pens cleaned out and 3 cords of wood stacked for the winter...I have a request for a living room post so I will do that next! Just wanted to let everyone know what was going on around this hut! Hope you all had a great weekend!


Friday, August 20, 2010

The Three R's...wall art...

Repurposing, Reusing and Recycling have become my mantra....not only is it incredibly exciting to hunt for treasure but it is very satisfying as the end result is usually a long lasting, QUALITY product...They just don't make things like they used to...this is a throw away society and people can just go get a new one of what ever they want...

Vintage everything has gone thru the roof, antique furniture and collectibles, classic cars as well as anything from the "olden days"....well, in my kitchen, we all know Lisa LOOOOVES vintage!  Wall art has been on my mind and I scouted the internet as well as piles of "garbage" people have thrown out...I picked the colors for the kitchen...red, white and black...what to hang on the wall then? I had a hard time with that...my picture grouping capabilities are not at all up to par...I did plates in the bathroom...but for my kitchen I wanted something different...but I wasn't going to spend a lot of money..and it was hard finding something to match! My treasure hunts were yielding nothing...repurposing, recycling or reusing wall art was not happening...

I finally went to the dollar store and purchased 3 more frames just like the one's I had attached to the hoosier doors... $3.00...one picture hanging kit complete with hooks, wire and tiny screw eyes...$1.00...one can of black spray paint...96cents... and a package of card stock from Walmart...$4.97 for 500 sheets...and then I scouted the web...grand total of $10.00 bucks...my limit for siting something as inexpensive...

This is what I came  up with...


Vintage Ephemera is plentiful on the web...it is available for download all over the place! I hurriedly put these together and took no time sizing them correctly or putting borders around them...I downloaded Photoscape as a free photo editing option...when I have more time? I will make them look terrific!  The neighbor that gave me the plants says she has a famous chef friend with the same pictures in his kitchen!  They go well in my tiny space and they echo my hoosier...it was important to me that they didn't overwhelm the wall or block any of the space to walk as sometimes picture frames hung this low catch on you when you walk by...
Eventually, I am going to print them on canvas so they look like paintings...it is incredibly easy to do if you have an ink jet printer...and this little beauty?
I am definitely printing on canvas...she has to go in my bathroom!


Wednesday, August 18, 2010

Repurposing and recycling kitchen cupboards

When I first put my kitchen up on HGTV, I had just mounted some  cupboards on the wall that the neighbor had given me...They were the heart of hearts to me...no more fishing in the pantry for pots and pans and glasses....plus I would have room for groceries in the pantry!

Vintage cupboards

vintage kitchen

The one large cupboard was twice as big as it is now...I originally wanted it to go behind the stove...we hung it up there...ended up conking myself in the noggin a couple of times and demolishing the paint on the wall..just to find out..it fit perfectly on that wall!   IF...you didn't mind that you could not get the doors open, the stove was in the way. Not going to work...We went on to the little one and hung it up, it worked out well...but what to do with the large one? It was midnight by then... I told my Honey that he was going to have to cut it in half...WHAT? Naw...really?  Yep...really! The era was perfect, they were built to last a hundred years and I was so sick of not having any! I was NOT going to give them up...or wait for something else...7 months with no storage in this hut was getting on my nerves! So my Honey went and got his saw and cut it in half...Aaaah...perfection...it fit beautifully!  He took the rest downstairs to use in his work shop...


There was one other thing wrong with the large cupboard, though...It was missing a door..

vintage kitchen


.I thought we could block off the middle and use it as shelves for display...BUT...then I would have to give up that storage space and after cleaning out the pantry, there was no way! What to do?   A plate rack? you know, the ones with the dowels running vertically? Hmmmm....that was an option...but then the dust from the stove would get on my dishes...scratch that....I really wanted a door...I could wait to see if I could find one...what are the chances of that?  Hmmmm.....Honey? Can you MAKE me a door?  Ooooh, Lisa...I could try...but I don't think it would come out right, I don't have the tools...PLEASE? Your uncle has the tools! I have to have a door, Honaaay! What do you think I could make it out of? Plywood is an option, I guess?  Nope...what about the doors on the other half of the cupboard, I said?  They are way to small, Lisa...Yes, I know that Honey, but what about cutting one in half and joining it to the half of another one? He rolled his eyes at me...but, to my advantage? My Honey can deny me nothing! That is why he is the most wonderful guy in the world! That is why he is the most wonderful door making guy in the world! Down to Uncle's we went...I thought while we were down there, we could cut openings in the doors for glass...so I could have doors and see all my pretty dishes too! That's not asking too much, is it? Well, that wasn't going to happen because when they cut the doors in half to make one whole door, the doors were hollow...no glass for me...BUT I did get a door to match the others!


I sanded and painted the cupboards, the inside was this horrible, annoying yellow!


vintage cabinet

vintage cupboard


My original plan had been to have glass in the doors with red insides...black handles and hinges and the outsides white...I got two out of the four...not bad...and we needed molding...I tried out several kinds, we had saved so much molding from the house and had used it in various projects...some of it was so brittle that when I took it off, it splintered and some of it had about 7 coats of lead base paint on it...we finally decided on a small crown molding, it really looked good  with the style of the cupboards...I also thought about not having any as the hoosier didn't have any and it was alright...but the cupboards look so much better with it!

The molding was as filthy as the house was when I got it...

vintage kithen cupboard
I painted the handles and the hinges black but I am still beside myself....I need glass in the doors....maybe someday! At the compost pile, I have been finding really old windows in great shape, there might be doors to my cupboards there someday! I had to switch all the doors around because we never thought of the part where the handles should match up...can you guess which door is the "Honey Made" one?

vintage kitchen cupboard


vintage kitchen

vintage kitchen

Cupboard Undies!


Future plans? I would like to make little red shelves to go along the sides of the cupboards...the round ones that you see in 1940's houses that are built in...we are also in the process of making the counter tops and bottom cupboards...I can't wait for those!  Just awhile longer...

Oh...and by the way...I didn't let my Honey keep the other half of the cupboards for his workshop! they came in really hand here...

New chicken nests....the yellow looks better out there!