Search This Blog

Saturday, May 28, 2011

Painting the house...


I want to paint the exterior of my house this summer....and I have been thinking really hard about color...the original color of this hut is white...but most of the houses in this town are white or some modern color of beige-brown...if they have been fixing up their house...boring!

I really want a neat color...and I have always loved red...I don't want a read house per se...but something  close to it....


I was surfing the net the other day...came across this house...it looks a lot like mine...

I LOOOOVE the color...and LOOOOVE the white trim...

What do you think about a cranberry colored hut?

Thursday, May 26, 2011

ROLL CALL!


I was just refreshing myself with all the news since I have been utterly self absorbed for the past week and a half!
My God...the weather is horrendous STILL! I think all of you....should move up to the UP with me...that way...no tornadoes, no drought...no flooding...Long winters but do- able....

Hoping all of you are well...my heart has been stuck in my throat since catching up on everything... please...again...forgive my selfish ways and send me a "HERE"...so we know you are all right! So many of you live in the path of this devastation!


Wednesday, May 25, 2011

WOW! Has it really...

been twelve days? I have been running around like crazy! This last two weeks has been the city wide garage sale and spring cleaning...I have been digging thru  lot's and lot's of piles and ending up with some great treasures!

In addition I have been readying my garden for planting, cleaning up my yard, helping others get their gardens in...attending church 3 days a week..raising baby ducklings, hatching chicks...and trying to save my cabin from destruction...finishing my garden fencing and re-arranging cold frames...

My yard last week ...did not amount to much...it looked like it did when I first planted it...a mound of dirt with little green things poking up in it


...BUT! 5 days later?

It is really starting to take off and fill in!

 I think this year...it is finally going to be a true cottage garden...I have started a picket fence and have some plans for some bushes to fill it in for year round interest...

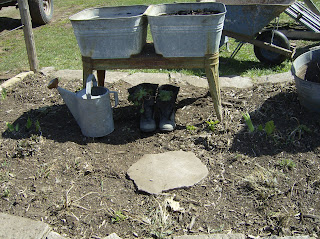
I redid the corner bed...it had a wheel barrow in it at first but it never did look good to me...


so this is what I did...I dug around in the cabin...as we were cleaning it out and tearing the ceiling down anyway...and this is what I found to put in this bed..


 I thought these old army boots planted with Hens and Chicks were so fun! The wash tubs are going to be full of some  flowery, colorful goodness and the watering cans too!

 It is starting to fill in quite nicely too! I had no idea I had so many plants in there as it looked so naked at first! The stump is one of my favorite things...I planted roses in front of it and in the top of it...it was filled with ant compost...beautiful black dirt and the rose seems to love it!

I wanted to throw in some tips about lasagna gardening too...I helped some families do this last week and they are still going at it diligently...collecting things and making awesome beds that you do NOT have to roto- til and rarely weed...plants love them! as you can see from just my flower beds!


This is what I do to start a new bed....

Lay down a thick layer of cardboard....lay it right on top of the grass or weeds...no need to dig up any sod or anything...it will smother the weeds and feed the dirt....line it with something you love...landscape timbers...railroad ties...rocks...get it really wet...another layer...in my case I used my chicken bedding...


but you can use anything considered a carbon...straw...leaves...dried grass...anything brown...get it really wet...then a green layer...green grass,  freshly mowed...table scraps....manure(fresh)...alfalfa hay...wet it...then a layer of  brown...wet it ...then green...wet it...then brown..wet it...
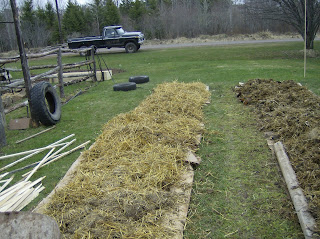


then green...you can intersperse layers of compost even if it is not fully done...and top it off with a 1/2 inch layer of dirt, compost...aged manure, etc....if you want but you do not have to...you can plant the same day you make the bed...if you are going to do this...separate the layers down to the cardboard and throw in a small amount of dirt or plant the seedling with the potting soil attached to it and you are ready to sit back and watch the biggest vegetables and flowers you have ever seen sprout forth! Your brown layers should be twice as thick as your green layers...but it is not an absolute...I used straw...compost..grass clipping and leaves...to make mine...I just kept adding a little at a time as I came upon materials...and I planted my artichokes in them 3 days ago...they are VERY happy and I just put the last layer on today...my bed was about 24 inches tall but in about 2 months the cardboard will be gone because worms LUH HUV cardboard and it will have composted down to beautiful black dirt with no weeds...you can also do this in containers instead of buying potting soil....a little bit of grass clippings or leaves make great mulch...I rarely have to water my gardens...

Artichoke


If you want to start seeds just put an inch layer of dirt on top and flatten it...throw down your seeds and water...

Here is my veggie garden to date...I have Broccoli...Cauliflower...Onions, Radishes...Lettuce, Kohlrabi...Peas...Spinach...Turnips..Beets, Rutabagas and Brussels Sprouts growing already!

I have, in my travels to various sales and piles lately netted some cool garden stuff like this flag pole holder...I put one in the front yard and one as the focal point and trellis in the Potager (Put-a- zhay) Garden....

Cauliflower

Egyptian walking onions


 One of the best parts about this garden? I can enjoy it from here...


Even though it is not put back together yet? It is a joy to sit in and it is actually exuding that English Cottage ambiance I have been after...



Friday, May 13, 2011

Hello my peeps!

I wanted to share these brand new little peeps with you two days ago but Blogger has been down and inaccessible!

I have to say...this was an amazing experience...the first one hatched out without me seeing...I looked in the incubator and there he was...laying on his back looking at me...I thought he was dead at first and then he just started rolling around all over the place...

I did get the second hatch on video....


This is after both were hatched and I stuck them in the brooder to dry off...a lot of the video and pictures are blurry because the humidity in the incubator has to be so high that it fogged the glass...


I am just so tickled to have these new little ducklings! and I am going to try and hatch chickens next!

Tuesday, May 10, 2011

We ARE HAVING A BABY!

Well...BABIES....DUCK babies...

About a month ago, we decided to try our hands at making an egg incubator...we had an old copper box with a light bulb and cord already wired into it...in fact...it was used as our first refrigerator...that is a different story, though! LOL!

We cut a hole in the top for a viewing panel and screwed a piece of old plexiglas to the lid so we could see what was going on in there...next we insulated with sheet board insulation and installed a hot water thermostat on the side...


drilled airholes... installed wire mesh above the light...added water bowls for humidity  and put in a 40 watt lightbulb...WALAH...incubator...


Well...it takes 21 days for chickens to hatch and 28 days for duck eggs to hatch.....for the last month, I have faithfully been monitoring my eggs...turning them three times a day and really looking after them...I even read up on candling...which is holding the egg up to a light and actually looking inside the egg...

There were definately baby ducks in there...you could see their heart beating and the outlines of their little beaks!


well...my 28 days came and went...nothing was happening...this is a critical time...I was thinking that all of them had died...and just as I was about to throw out these eggs...thinking it was a total failure...my Honey begged for two more days... til Thursday Baby Doll...just wait til Thursday!...and then.this happened today...

 The eggs were pipping! Those lil babies were peeping and breaking thru the shells!

I peeped at them...and they peeped back at me!

I have six eggs in there...and only two are viable...but those little duckies are breaking out!

My little Pekin Hen is sitting on a clutch too...I wasn't sure if she was going to be a good Mama or not...but that little girl is being the best broody Mama EVER!

 And the Drake? He puts anything that gets near her on the run! He is quite obnoxious...he went from friendly little duck to flying at you and chasing you...and don't even bother talking to her...

If all this works out? I will have hatched two duckies and she will hav 13! Chickens are next...we need a crop of fifty for next years meat supply...

Sunday, May 8, 2011

Happy Mother's Day!

 Not having a Mother myself...makes today all the more special for me...I have been blessed with many wonderful children in my life...but my Daughter Stephanie is my best friend and an extraordinary Mother herself...

She gave me this little guy first....

 and then?

This little girl....

Being a Mother is an incredible experience...and being a Grand Mother?  Even more so....

Happy Mother's Day to my beautiful Daughter Stephanie....and to all the Mama's out there!

Thursday, May 5, 2011

Craaazy week and a kitchen update!

First I have to thank Inga at Ingas Haven for an  AWARD!  She gave me the Liebster Blog award! :o)

 Liebster means Sweet Heart in German...and this is the information I gleaned on how it came about...according to this kind lady....


"Some time (in the recent past), somewhere (rumor has it that it might be Germany), someone (I am guessing he/she was named Liebster) decided to do something nice for a whole lot of bloggers and started the Liebster Blog Award."


"The value behind this award is for us to get to know other bloggers who might not be well known, yet have a lot to share. And we see that. This is not about growing your list of followers (believe me, it won’t happen), but of building a community."

I love being part of the blogging community!


 THANK YOU INGA!

This past week has been a wee bit nuts! In between trying to finish the kitchen, the living room and helping others get their gardens in place...as well as my own garden...spring has sprung intermittently in the UP...it is 60 degrees out one day....and snowing 7 inches the next day!  I have also become....a NON SMOKER after 30 years....AND I have given up coffee...two pots a day for 20 some years...the first week was very hard for me...but I just could not tolerate the smell any more...it really bothered me...I have an uncanny sense of smell...even for being a long term smoker...and the odor is what finally made me quit...

I am still putting pieces together in the house but my efforts have been outside this past week...

The kitchen is far from done...as with everything in the recycle, re-purpose...re-use department...waiting for the right stuff to appear can take a while...but the floors...oooooh....I love them....what a difference they made...

I still have to caulk some in the living room and put another coat on it... I just couldn't take any more sanding, scraping, painting or caulking this last week...so it is on hold...

The kitchen, however...I am in love with...the floor is finished in there...as well as some of the other details...

As you all have probably been noticing...we have begun making countertops in the kitchen out of the pallets.. and the other two found table legs that match the sink skirt....I did not want traditional cabinets on the bottom...after having just the one for awhile...I noticed that it made my kitchen look smaller...so I really wanted open shelving...but with animals, having dishes and what not on shelves  close to the floor was not happening...I was not prepared to clean dust and hair out of my dishes or food stuffs every time I wanted to use them... so we opted for one shelf...18 inches from the floor and....a drawer...I was originally thinking baskets but I needed something sturdier...I asked my Honey to make me a drawer to fit under there...on wheels with three compartments...I thought I would put root veggies in there since you shouldn't put them in the fridge and I was really tired of chasing them around in the pantry....oh...and it had to look like an old wood crate...;o)


I have a a couple of old galvanized garbage cans headed for the scrap yard... they have the most interesting galvanized D-ring handles on them....What do you think? I was sure they would be perfect for this old crate/drawer.... but maybe I am just tetched in the head...I need help on this one!


 But as to the rest of the kitchen...


 Every time I walk into my kitchen? I just smile...it is so bright...and so very cute...and the decision to take down that drywall? was a GREAT decision...it looks like it should...and it has such a roomy...airy...happy feel to it...cleaning is a breeze...a quick broom...a quick damp mop...with a little vinegar? and back to shiny tidy whitey...

My Honey...the first time he saw it?  He said..."It looks like our house grew!"  The illusion is amazing...it really does look waaay bigger inside!